|
There have been many times when I overcooked a roast in the oven. It still tasted great but needed a lot of help from the gravy. So when I got my Anova sous vide, one of the first things I learned to cook in it is roast beef. You can use whatever cut you want but cuts that are already soft to begin with, like tenderloin and ribeye, doesn't seem to work as well. So I would suggest sticking to cuts like chuck or eye of round or brisket. This recipe will take over a day of cooking so plan ahead.
1. Liberally rub the roast with your choice dry spices. I tend to not salt the roast at this stage and usually wait till the searing stage to salt.
2. Seal the roast using a vacuum sealer or using the ziploc bag method 3. Cook in a water bath at 129 degrees fahrenheit for 20-24 hours (depending on the thickness of your roast). This will cook the roast to a medium rare to medium doneness 4. Remove from the bag and dry off the roast with a paper towel. You can re-season the roast with your choice of spices and salt at this stage before searing it 5. Sear the meat on all sides in a hot pan, or in the oven at broil. You can also use a torch but it may take a long time so I would suggest using a pan/oven first and using a torch to get at spots missed. 6. You dont need to let the meat rest when you cook in a sous vide so you can cut slices whenever you are ready to serve. However, letting it sit for 10-15 mins doesnt hurt either!
0 Comments
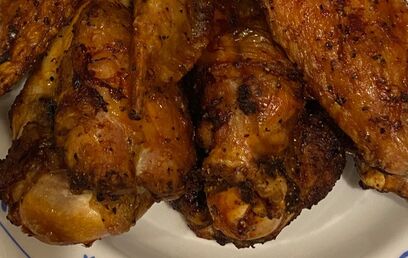 Air frying is starting to become one of my favourite ways to cook (just a notch below using my sous vide). Come to think of it, there must be some recipes that I can do using both. Hmmmm... wheels are turning now! But for now, here is my super simple Crispy Turkey Wings recipe.
2. Rinse and dry off with a paper towel.
3. Preheat your air fryer (I usually preheat at 400 degrees fahrenheit for 5 mins) 4. Lightly coat the turkey wings with olive oil. 5. Rub the salt, lemon pepper and cajun seasoning all over the turkey. The amount will vary to your taste. 6. Arrange the turkey into the air fryer basket in a single layer. 7. Cook at 385 degrees fahrenheit for 20 mins, then flip the turkey pieces 8. Turn up the heat to 395 degrees fahrenheit and cook for another 10 mins. At this time, the smaller pieces can be taken out. The larger pieces will likely need another 10 mins or so (depending on thickness). Pro Tip: If your turkey is straight out of the fridge, the cooking times will be longer so you will need to adjust accordingly. This recipe will also work with chicken wings but cooking times will be slightly less. It's starting to become a Boxing day tradition around here that I make Veggie and Ham soup with the left over ham from Christmas dinner. It's really easy to make and will use up a lot of whats left over in your fridge.
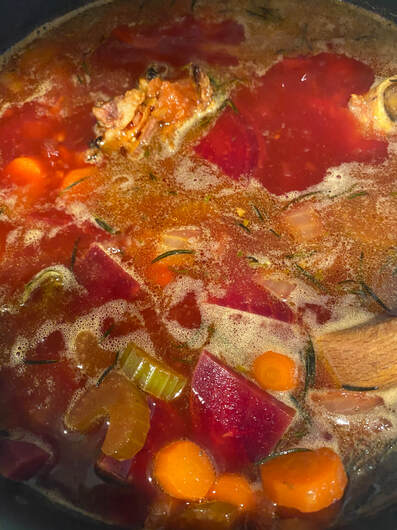
2. (Optional) add brown rice, or barley, or lentils. With the addition of rice and barley, the longer the soup sits, the more they will expand and thicken the soup. So be careful and dont add too much at the outset
3. Add herbs like rosemary, thyme, oregano, bay leaf, paprika, etc 4. Add ham (and ham bone if available) 5. Cover with water (or bouillon, broth, stock) and bring to a boil 6. Turn down heat and let simmer for an hour or two 7. About 30 mins before serving add kale or other hearty greens like beet tops, swiss chard. This year, I didnt have any of these and decided to add beets cuz I found some in the fridge! Turned out ok but made the soup a little too sweet 8. Add salt and pepper to taste
Crispy Pork Belly also known as Lechon Kawali in Filipino or Siu Yuk (燒肉) in Chinese, is one of my favourite dishes. I have always hated making it at home since it requires so much oil to deep fry and we rarely deep fry anything so all that oil would end up going to waste. But that all changed now that I picked up an air fryer during Boxing Day! This recipe involves the pork sitting for at least 12 hours so plan well in adavance and the pork must be skin on, otherwise, you will not get the proper crispy skin consistency. Your local supermarket may not have skin on pork belly and you may need to visit your local butcher to get some. Just like my boar chop recipe, the prep for this dish can be done days in advance and finished off in the air fryer when you are ready to eat it. Trust me, it's totally worth it. I've colour coded the ingredients and the instructions for this recipe since it is a little more involved compared to my other recipes, I hope it helps.
Directions:
1. Score the meat part of the pork belly being very careful not to go all the way through to the fat part. I like to score the meat in a diamond pattern about 1/2 inch apart. Doing this step allows you to season the meat evenly with the 5 spice powder that is to come later on in the instructions. 2. Boil skin on pork belly in water with the green onions, regular onions, bay leaves, black pepper, garlic, salt, sugar. Feel free to add other aromatics that you like. Boil for around 12 - 15 mins 3. Take out and cool on a rack. Once cooled (it doesnt have to be completely cool, just whatever temperature your hands can handle) use the skewer to poke a bunch of holes in the skin being careful not to go all the way through to the meat. The more the better, as this step will help give you that crackly and puffy skin 4. Brush skin only with vinegar and rub with salt, let sit & repeat in 20 mins 5. Place in the fridge for at least 12 hours uncovered, if you can, periodically dry off any moisture that comes out of the skin. (Thinking about this step, I suppose you could place the pork in front of a fan to dry out faster. I'm not sure if this will work though. If anyone has done this, please let me know) 6. Rub all sides, except the skin (top) liberally with 5 spice and salt. I have heard of people rubbing the skin with watered down soy sauce or even Coca-Cola which gives the skin a texture similar to the Spit Roasted Lechon. I have not tried this myself but am intrigued! 7. Air fry skin side up at 395 degrees fahrenheit for 40 - 50 mins depending on thickness of your pork belly. You dont need to flip it or even brush it with any more oil since its own fat will start coming out of the little holes that you've made on the skin. 8. Take out of air fryer and let sit for 15 mins before cutting into pieces. If you cut the pork right away, the skin will not cooperate and will likely fall off or shatter. Serve as is or with some spicy vinegar with soy sauce. This is by no means authentic Mexican food but it's yummy nonetheless! The best thing about this soup is the toppings that you can add to it, you can customize it to the way you want it and every bite is different from the last. I'm sure it'll be a hit with your family. Next time I make this soup, I will try a different method to add that smokey element to the soup. It is a bit more involved and involves making a sauce with dried Ancho chillies. I will update this post if it turns out ok. Ingredients list For the soup 2 lbs lean (or extra lean) ground beef 1 cup each of Carrots, Onions, Celery, and tomatoes 2 cloves Garlic 4 Bay leaves 2-3 dried chillies 1 pack taco seasoning Beef Broth / Water Worcestershire Sauce, Paprika, Cayenne powder, Cumin, Oregano, Salt, Black peper (amounts vary per your taste) 1 cup frozen corn 1/8 to 1/4 cup Smokey type hot sauce (I like the Trader Joes one but can be pretty much anything you like) For the Toppings: Lime Cilantro Sour Cream Avocado Cabbage or Lettuce (iceberg works the best in my tests) Onions Tortilla chips
4. Add enough water and/or beef broth so that theres about 3/4 inch of liquid above the meat & veg mixture
5. Bring to a rapid boil then turn down and let simmer for 45 mins 6. About 20 mins before serving, add frozen corn and check seasoning. At this stage I like to add a smoky flavoured hot sauce, Trader Joe’s chili sauce is one of my faves 7. Serve with fresh cilantro, cabbage/lettuce, raw onions, sour cream, tortilla chips, lime, & avocado (optional) |
AuthorJoin me as I celebrate life through travel, food and photography. Archives
July 2023
Categories
All
I will only send out newsletters once a month or so. I promise not to spam
|

 RSS Feed
|
|
All images on this site have been taken by me unless otherwise stated or re-blogged. You may re-post/re-blog my material as long as you give credit and do not profit. Thank you - Jeff
|
© COPYRIGHT 2022. ALL RIGHTS RESERVED.
|
